You can tell if you have a mechanical chime by removing the cover and checking to see if there is a metal chime that is physically hit by a strike.
Puede saber si tiene una campanilla mecánica retirando la cubierta y verificando si hay una campanilla de metal que es golpeada físicamente por un puntero.
Para saber se sua campainha é mecânica, remova a tampa do módulo interno e verifique se o toque da campainha é produzido por um dispositivo de metal.
Vous pouvez déterminer si vous avez un carillon mécanique en retirant le couvercle et en vérifiant s’il y a un carillon en métal qui touche une gâche.
You can tell if you have a digital door chime by removing the cover and checking to see if there is a speaker that plays the doorbell sound.
Standard Mechanical and Digital Chimes – look for chimes with standard Front, Trans, and Rear wire terminals. Additional wire terminals, +/- terminals, or “Com” terminals may indicate a chime supports additional functions and is not supported.
Puede saber si tiene una campanilla de puerta digital retirando la cubierta y verificando si hay un altavoz que reproduce el sonido del timbre de puerta.
Para saber se sua campainha é digital, remova a tampa do módulo interno e verifique se o toque da campainha é produzido por um alto-falante que reproduz o som da campainha.
Vous pouvez déterminer si vous avez un carillon numérique en retirant le couvercle et en vérifiant si un haut-parleur joue le son de la sonnette.
- Byron 1210, 771, 776, 761
- Honeywell Friedland E2500, DW315s, DC917s, D792, D107 Facet, D117 Ding Dong, D103 GALA, D230 Big Ben
- Panasonic EC5117WKP, EC5227W, EC5347
- Arlec DCS13
- Axiom DBYRK1
- Chacon 84199
- Grothe CROMA 230
- REV Westminster Gong
- ASC 102B Campanilla
- MJK Modelo 494, 212
- Byron 1210, 771, 776, 761
- Honeywell Friedland E2500, DW315s, DC917s, D792, D107 Facet, D117 Ding Dong, D103 GALA, D230 Big Ben
- Panasonic EC5117WKP, EC5227W, EC5347
- Arlec DCS13
- Axiom DBYRK1
- Chacon 84199
- Grothe CROMA 230
- REV Westminster Gong
- ASC 102B Campanilla
- MJK Modelo 494, 212
Si continúa teniendo problemas, consulte esta lista de campanilla compatibles que han sido probadas y certificadas por Alarm.com:
- Byron 1210, 771, 776, 761
- Honeywell Friedland E2500, DW315s, DC917s, D792, D107 Facet, D117 Ding Dong, D103 GALA, D230 Big Ben
- Panasonic EC5117WKP, EC5227W, EC5347
- Arlec DCS13
- Axiom DBYRK1
- Chacon 84199
- Grothe CROMA 230
- REV Westminster Gong
- ASC 102B Campanilla
- MJK Modelo 494, 212
Se os problemas persistirem, consulte a seguinte lista de módulos internos de campainha compatíveis, testados e certificados pela Alarm.com:
- Byron 1210, 771, 776, 761
- Honeywell Friedland E2500, DW315s, DC917s, D792, D107 Facet, D117 Ding Dong, D103 GALA, D230 Big Ben
- Panasonic EC5117WKP, EC5227W, EC5347
- Arlec DCS13
- Axiom DBYRK1
- Chacon 84199
- Grothe CROMA 230
- REV Westminster Gong
- ASC 102B Campanilla
- MJK Modelo 494, 212
Wire the ADC-VDB770 without a chime
Conecte el ADC-VDB770 sin una campanilla
Conexão da campainha com câmera ADC-VDB770 sem módulo interno de campainha
Câbler l’ADC-VDB770 sans carillon
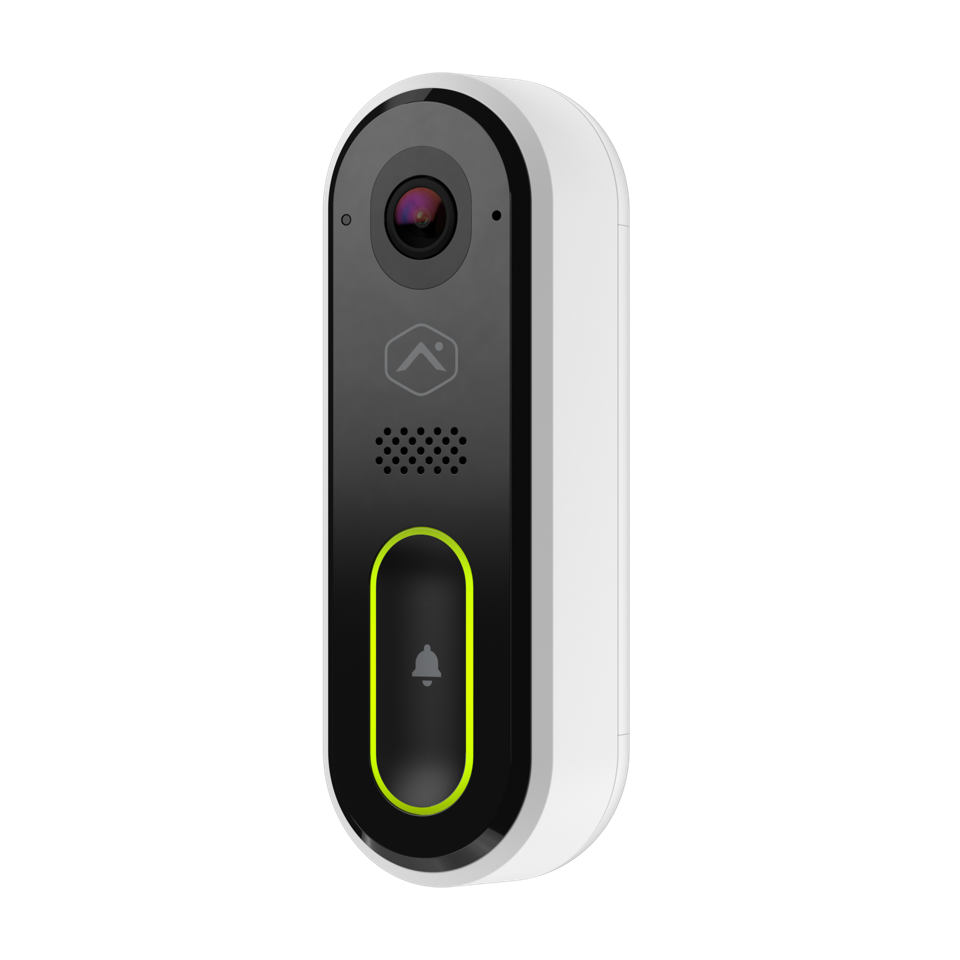
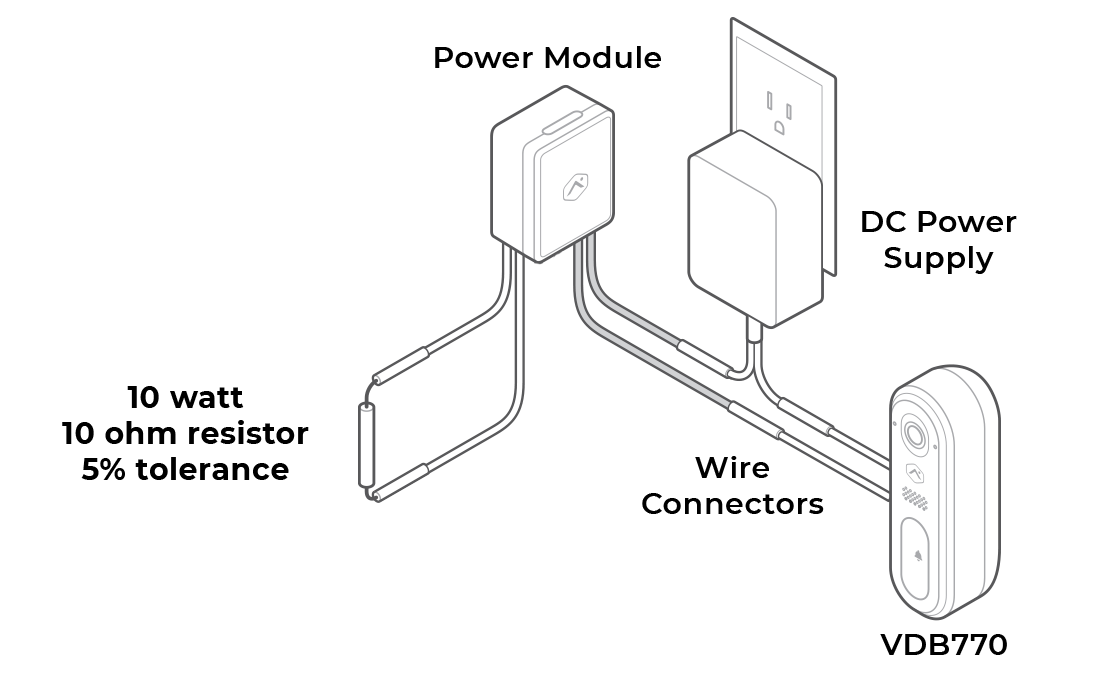
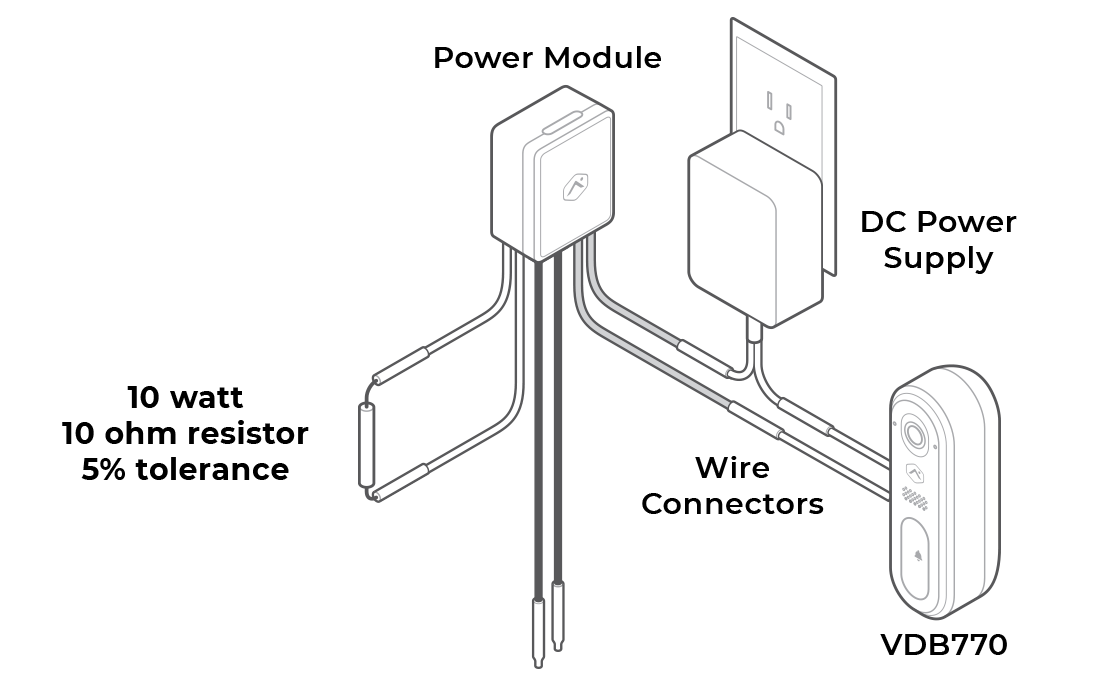
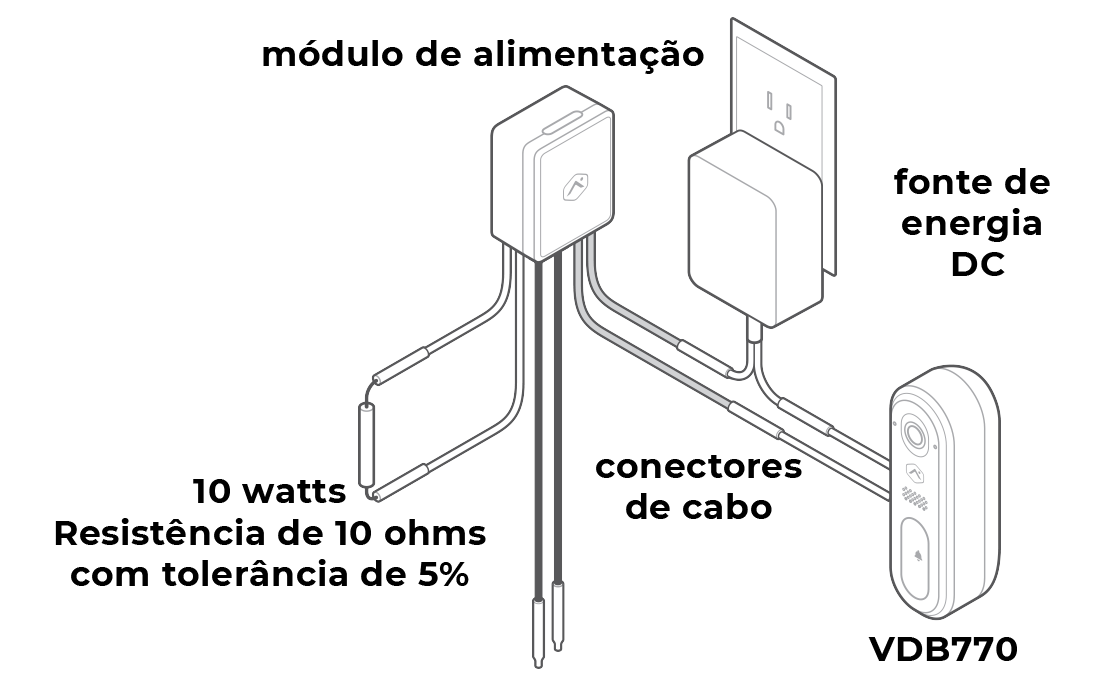
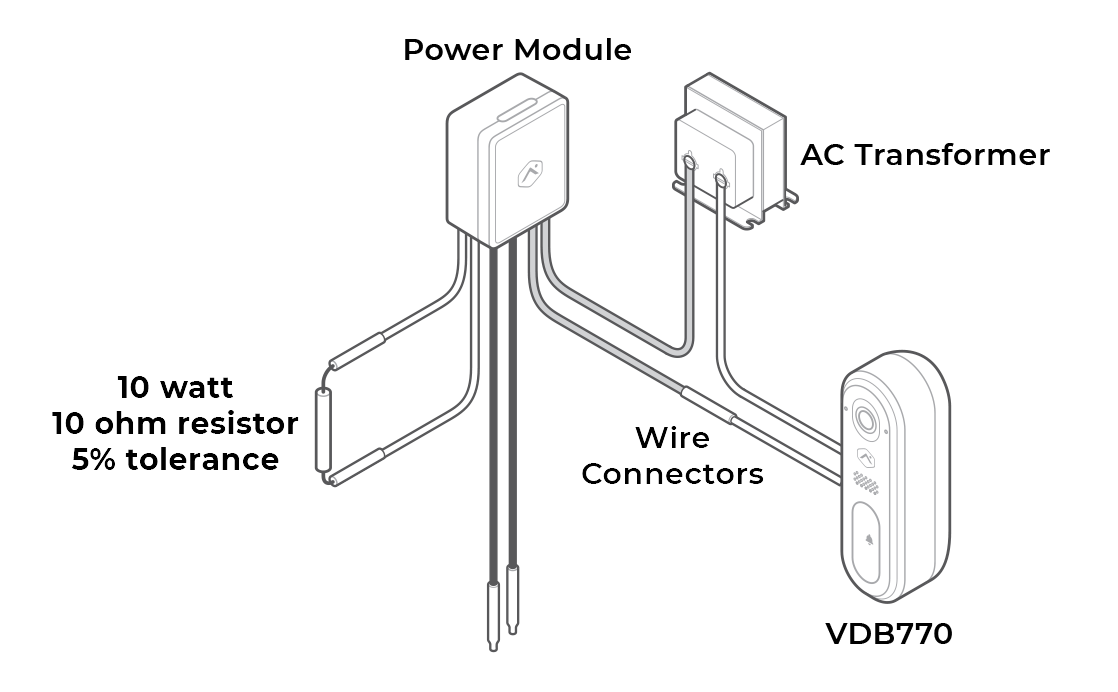
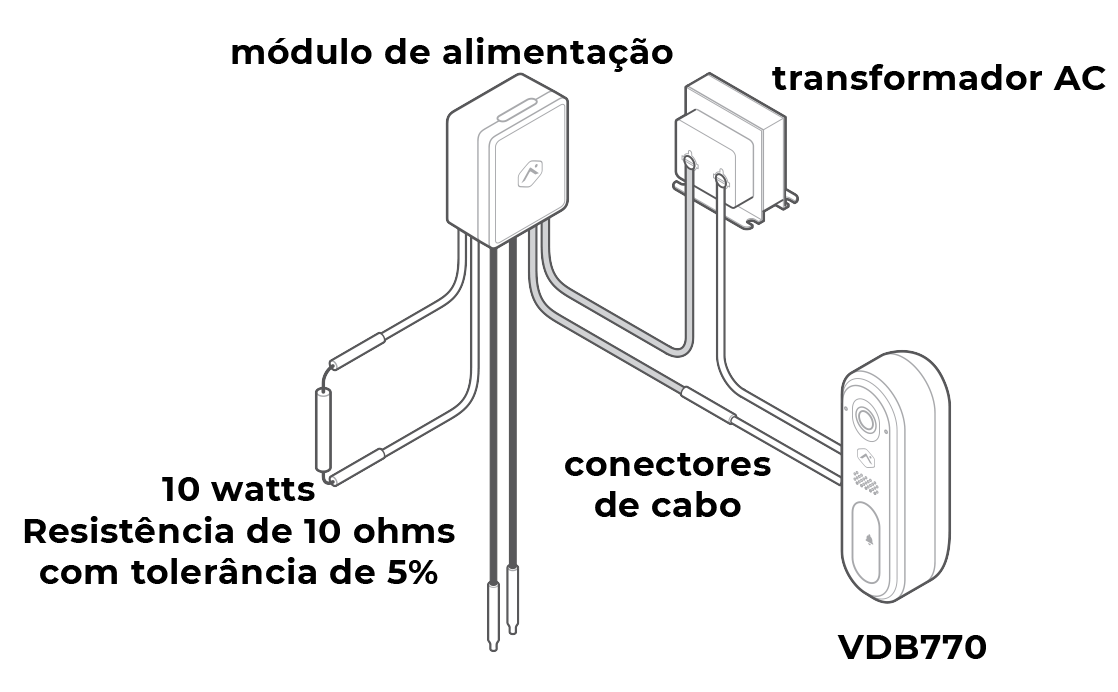
The ADC-VDB770 can be powered without a chime, but it requires a resistor rated at 10 Watts 10 Ohms with 5% tolerance. If you are using a plug-in DC power supply, you cannot use a chime. Therefore, you must use the following wiring configuration below.
For more information about enrolling the ADC-VDB770, see Alarm.com/doorbell/install.
To wire the ADC-VDB770 without a chime:
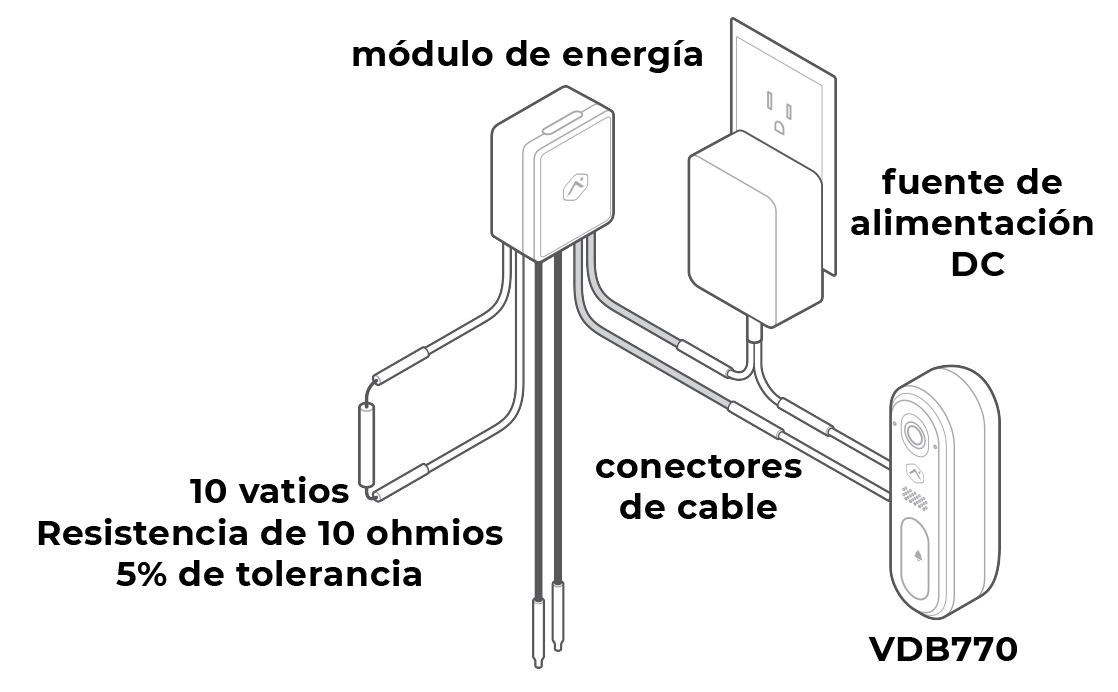
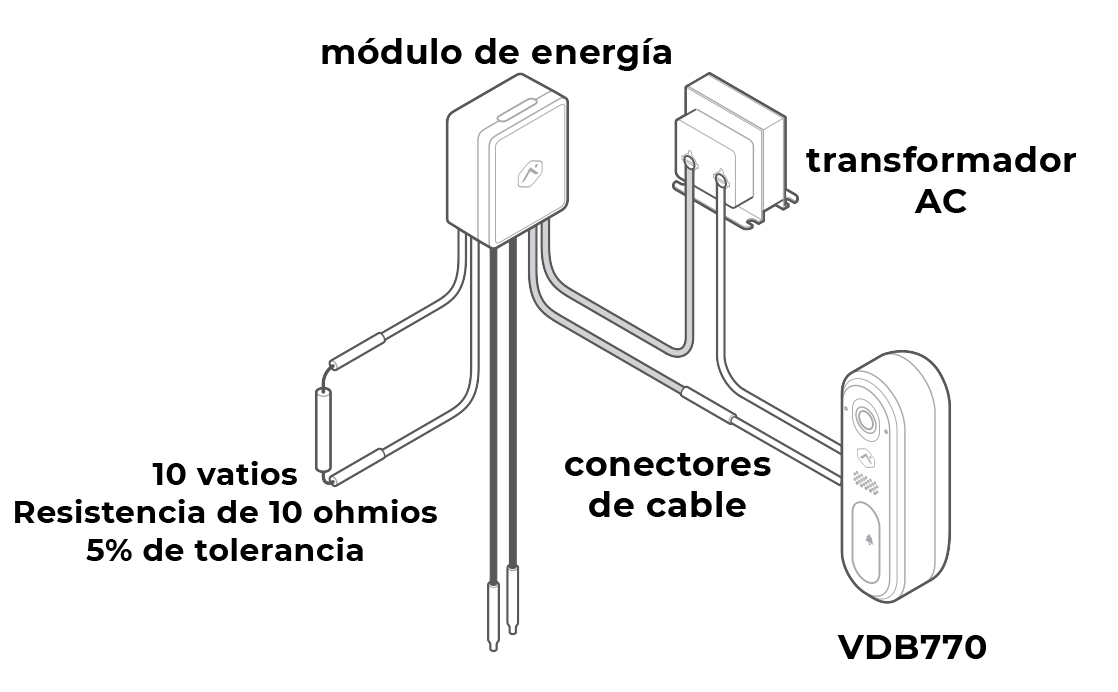
El ADC-VDB770 se puede alimentar sin una campanilla, pero requiere una resistencia nominal de 10 vatios y 10 ohmios con una tolerancia del 5 %. Si está utilizando una fuente de alimentación de CD enchufable, no puede utilizar una campanilla. Por lo tanto, debe utilizar la configuración de cableado a continuación.
Para obtener más información sobre cómo inscribir el ADC-VDB770, consulte Alarm.com/doorbell/install.
Para cablear el ADC-VDB770 sin una campanilla:
É possível instalar a campainha com câmera ADC-VDB770 sem usar um módulo interno de campainha. No entanto, esse processo requer um resistor de 10 Watts, 10 Ohms e 5% de tolerância. Se você estiver usando uma fonte de alimentação CC do tipo conector, não será possível usar um módulo interno de campainha. Dessa forma, será necessário usar a configuração de fiação descrita a seguir.
Para obter mais informações sobre a inclusão da campainha com câmera ADC-VDB770, acesse Alarm.com/doorbell/install.
Para conectar a campainha com câmera ADC-VDB770 sem módulo interno de campainha:
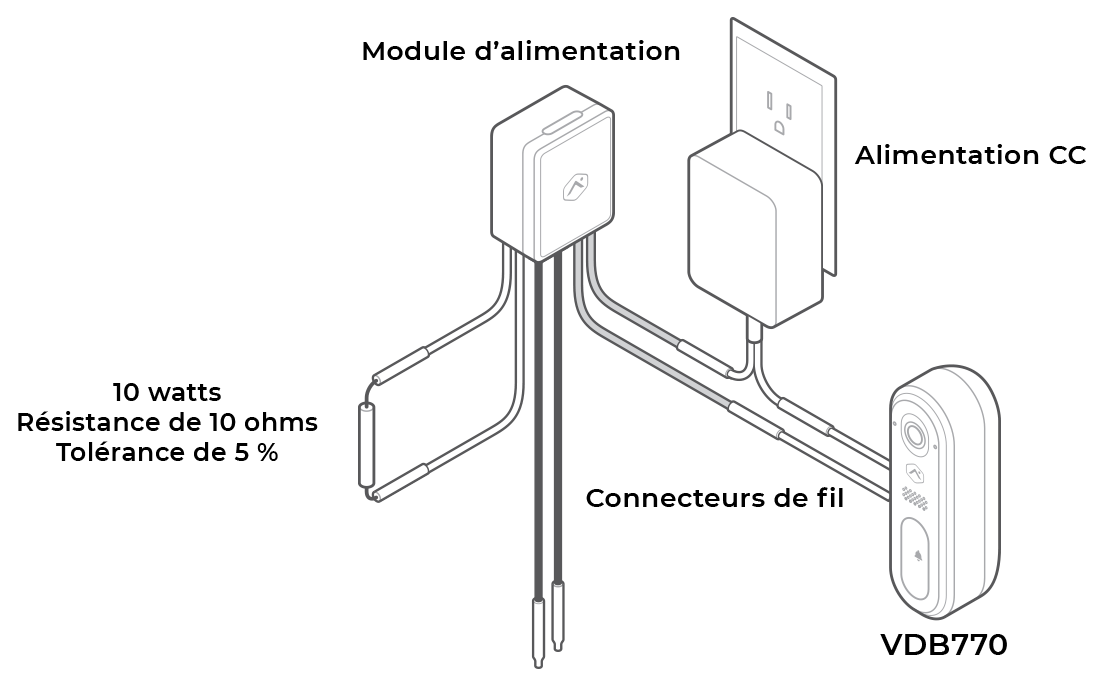
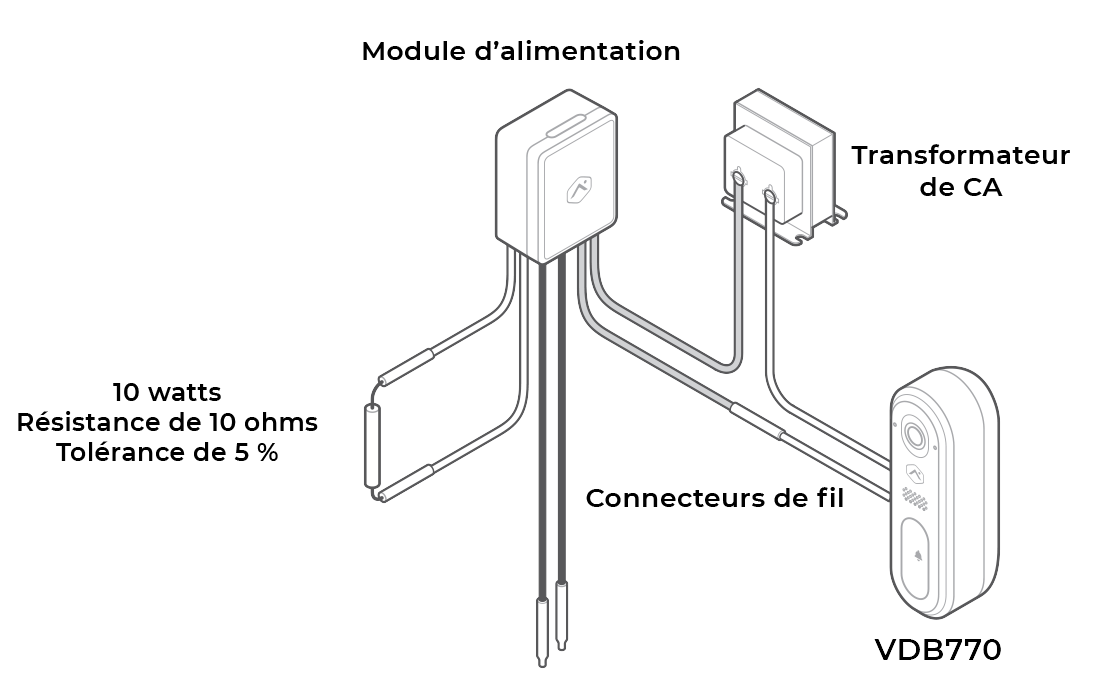
L’ADC-VDB770 peut être alimenté sans carillon, mais il nécessite une résistance de 10 watts 10 ohms avec une tolérance de 5 %. Si vous utilisez un bloc d’alimentation CC enfichable, vous ne pouvez pas utiliser de carillon. Par conséquent, vous devez utiliser la configuration de câblage suivante.
Pour plus d’informations sur l’inscription de l’ADC-VDB770, voir Alarm.com/doorbell/install.
Pour câbler l’ADC-VDB770 sans carillon :
- On the power module, attach the white wires interchangeably to a resistor (10 Watts 10 Ohms with 5% tolerance).
- En el módulo de alimentación, conecte los cables blancos indistintamente a una resistencia (10 vatios, 10 ohmios con tolerancia del 5 %).
- No módulo de alimentação, conecte os fios brancos a um resistor de 10 Watts, 10 Ohms e 5% de tolerância.
- Sur le module d’alimentation, attachez les fils blancs de façon interchangeable à une résistance (10 watts 10 ohms avec 5 % de tolérance).
- Attach the gray wires interchangeably to the DC Power Supply and the ADC-VDB770.
- Attach the gray wires interchangeably to the DC Power Supply or AC Transformer and the ADC-VDB770.
- Conecte los cables grises indistintamente a la fuente de alimentación de CD y al ADC-VDB770.
- Conecte os fios cinza à fonte de alimentação CC e à campainha com câmera ADC-VDB770.
- Attachez les fils gris de façon interchangeable au bloc d’alimentation CC et à l’ADC-VDB770.
- Do not connect the black wires (these should remain insulated and not in contact with any components) – this can result in damage to hardware.
- No conecte los cables negros a ningún terminal (estos deben permanecer aislados y no en contacto eléctrico con ningún componente), esto puede resultar en daños al hardware.
- Não conecte os fios pretos. Eles devem permanecer isolados e sem contato elétrico com nenhum componente. Conectá-los pode danificar o dispositivo.
Copyright © 2000-2024, Alarm.com. All rights reserved.
Alarm.com and the Alarm.com Logo are registered trademarks of Alarm.com.
Copyright © 2000-2024, Alarm.com. Todos los derechos reservados.
Alarm.com y el logotipo de Alarm.com son marcas registradas de Alarm.com.
Copyright © 2000-2024, Alarm.com. Todos os direitos reservados.
Alarm.com e o logotipo Alarm.com são marcas registradas da Alarm.com.
Copyright © 2000-2024, Alarm.com. Tous droits réservés.
Alarm.com et le logo d’Alarm.com sont des marques de commerce déposées d’Alarm.com.


