Power GuideGuía de energíaGuia de alimentaçãoGuide d’alimentation
The ADC-VDB770 can be powered by a doorbell chime transformer or a plug-in DC power supply. If there is no transformer installed at the location, or if an existing transformer needs to be replaced, this page defines recommended specifications for a new transformer or plug-in DC power supply.
Transformers are most commonly installed next to the breaker box in a home but are also often installed in the walls of a house meaning that the wires would need to be traced to find them.
When the ADC-VDB770 is configured with a wired chime and the button is pressed, an internal battery is used to power the device while the transformer is powering the chime. Over time, the battery may exhibit reduced performance. This page also includes procedures to replace the ADC-VDB770 battery using either a Battery Replacement Kit (ADC-VDBA-770BAT) or a Battery-Less Insert Kit (ADC-VDBA-770BLI).
El ADC-VDB770 se puede alimentar mediante un transformador de timbre de campanilla o una fuente de alimentación de CD enchufable. Si no hay un transformador instalado en la ubicación, o si es necesario reemplazar un transformador existente, esta página repasa las especificaciones recomendadas para un nuevo transformador o fuente de alimentación de CD enchufable.
Los transformadores se instalan más comúnmente al lado de la caja de interruptores en una casa, pero a menudo también se instalan en las paredes, lo que significa que los cables deben rastrearse para encontrarlos.
A campainha com câmera ADC-VDB770 pode receber alimentação do transformador do módulo interno da campainha ou de uma fonte de alimentação CC do tipo conector. Para instalações que não têm transformador ou cujo transformador deve ser substituído, esta página informa as especificações recomendadas do novo transformador e da fonte de alimentação CC do tipo conector.
Em geral, os transformadores são instalados próximo ao quadro de distribuição residencial, mas também podem ser instalados na parede. Neste caso, será necessário localizar a passagem dos fios.
L’ADC-VDB770 peut être alimenté par un transformateur de carillon de sonnette ou une alimentation CC enfichable. S’il n’y a pas de transformateur installé sur place ou si un transformateur existant doit être remplacé, cette page passe en revue les caractéristiques recommandées pour un nouveau transformateur ou un nouveau bloc d’alimentation enfichable en courant continu.
Les transformateurs sont le plus souvent installés à côté du disjoncteur dans une maison, mais peuvent également être installés dans les murs d’une maison, ce qui signifie qu’il faut suivre les fils pour les trouver.

AC Doorbell Transformer
Transformador de timbre de puerta de CA
Transformador CA da campainha
Transformateur de sonnette CA
AC transformers are the primary power method of the VDB770.
Los transformadores de CA son el método de alimentación principal del VDB770.
Os transformadores CA são a principal fonte de alimentação da campainha com câmera VDB770.
Les transformateurs CA représentent la méthode d’alimentation principale du VDB770.
Recommended Rating
-
- Minimum output: 16 VAC 10 VA.
- Add 10 VA for each additional doorbell camera to be wired to the transformer (e.g., for two doorbell cameras, the recommended output is 16 VAC 20 VA).
- Purpose: Provides power for a permanent installation with a chime and doorbell camera.
- Other considerations: If the transformer has multiple outputs, verify that the doorbell camera and chime are wired to the correct leads for their power needs.
- Minimum output: 16 VAC 10 VA.
Calificación recomendada
-
- Salida mínima: 16 VCA 10 VA.
- Agregue 10 VA por cada timbre con cámara adicional que se conectará al transformador (por ejemplo, para dos cámaras de timbre, la salida recomendada es 16 VCA 20 VA).
- Propósito: proporciona energía para una instalación permanente con una campanilla y un timbre con cámara.
- Otras consideraciones: si el transformador tiene múltiples salidas, verifique que el timbre con cámara y la campanilla estén conectados a los cables correctos para sus necesidades de energía.
- If you received a transformer as part of your doorbell bundle, please refer to the instructions included in the transformer box.
- Salida mínima: 16 VCA 10 VA.
Classificação recomendada
-
- Saída mínima: 16 VCA e 10 VA.
- Acrescente 10 VA para cada campainha com câmera adicional a ser conectada ao transformador (por exemplo, para duas campainhas com câmeras, a saída recomendada é de 16 VCA e 20 VA).
- Acrescente 10 VA para cada campainha com câmera adicional a ser conectada ao transformador (por exemplo, para duas campainhas com câmeras, a saída recomendada é de 16 VCA e 20 VA).
- Objetivo: fornecer alimentação para a instalação permanente com módulo interno e campainha com câmera.
- Outras considerações: se o transformador tiver várias saídas, verifique se a campainha com câmera e o módulo interno estão conectados aos fios adequados para a alimentação necessária.
- If you received a transformer as part of your doorbell bundle, please refer to the instructions included in the transformer box.
- Saída mínima: 16 VCA e 10 VA.
Puissance nominale recommandée
-
- Sortie minimale : 16 VCA 10 VA.
- Ajoutez 10 VA pour chaque caméra de sonnette supplémentaire à raccorder au transformateur (par exemple, pour deux caméras de sonnette, la sortie recommandée est de 16 VCA 20 VA).
- Ajoutez 10 VA pour chaque caméra de sonnette supplémentaire à raccorder au transformateur (par exemple, pour deux caméras de sonnette, la sortie recommandée est de 16 VCA 20 VA).
- Objectif : fournit l’alimentation pour une installation permanente avec un carillon et une caméra de sonnette.
- Autres considérations : si le transformateur a plusieurs sorties, vérifiez que la caméra et le carillon de la sonnette sont câblés aux fils correspondant à leurs besoins en alimentation.
- Sortie minimale : 16 VCA 10 VA.
Transformer Image
Image du transformateur
Plug-in DC Power Supply
Fuente de alimentación de CD enchufable
Fonte de alimentação CC tipo conector
Bloc d’alimentation CC enfichable
Most Alarm.com doorbell installations make use of the existing chime and transformer in the building. A plug-in DC power supply is an alternative option.
Caution: If an ADC-VDB770 is wired to a DC power supply, a 10 Watt 10 Ohm resistor must be added to the circuit to prevent damage to the doorbell camera. The power module is still required. Existing chimes are not compatible with the DC Power Supply setup. For details on the wiring set up go to Alarm.com/doorbell/chime.
La mayoría de las instalaciones de timbres de puerta de Alarm.com utilizan la campanilla y el transformador existentes en el edificio. Una fuente de alimentación de CD enchufable es una opción alternativa.
Precaución: si se conecta un ADC-VDB770 a una fuente de alimentación de CD, se debe agregar una resistencia de 10 vatios y 10 ohmios al circuito para evitar daños en el timbre con cámara. Aún se requiere el módulo de energía. Las campanillas existentes no son compatibles con la configuración de la fuente de alimentación de CD. Para obtener detalles sobre la configuración del cableado, vaya a Alarm.com/doorbell/chime.
A maioria das instalações de campainha da Alarm.com usa o módulo interno de campainha e o transformador existentes na instalação. Outra opção é usar a fonte de alimentação CC tipo conector.
Atenção: se a câmera ADC-VDB770 for conectada a uma fonte de alimentação CC, será necessário adicionar um resistor de 10 Watt e 10 ohm ao circuito para evitar danos à campainha com câmera. O módulo de alimentação continua sendo necessário. Os módulos internos existentes não são compatíveis com o uso de fonte de alimentação CC. Para mais informações sobre a configuração da fiação, acesse Alarm.com/doorbell/chime.
La plupart des installations de sonnette Alarm.com utilisent le carillon et le transformateur existant dans l’immeuble. Un bloc d’alimentation CC enfichable est une autre possibilité.
Attention :si un ADC-VDB770 est branché à une alimentation CC, une résistance de 10 Watt 10 Ohm doit être ajoutée au circuit pour éviter d’endommager la caméra de sonnette. Il faut tout de même un module d’alimentation. Les carillons existants ne sont pas compatibles avec la configuration du bloc d’alimentation CC. Pour plus de détails sur la configuration du câblage, accédez à Alarm.com/doorbell/chime.
Recommended Rating
- Minimum output: 15V, 8W.
- Purpose: Provides power for a permanent installation.
- Please see ADC-VDBA-PSU-DC as an approved DC Power Supply for the ADC-VDB770
Calificación recomendada
- Salida mínima: 15V, 8W.
- Propósito: proporciona energía para una instalación permanente.
- Consulte ADC-VDBA-PSU-DC como fuente de alimentación de CD aprobada para el ADC-VDB770.
Classificação recomendada
- Saída mínima: 15 V e 8 W.
- Objetivo: fornecer alimentação para a instalação permanente.
- Consulte o dispositivo ADC-VDBA-PSU-DC, uma fonte de alimentação CC aprovada para a câmera ADC-VDB770
Puissance nominale recommandée
- Sortie minimale : 15 V, 8 W.
- Objectif : alimenter une installation permanente.
- Veuillez considérer ADC-VDBA-PSU-DC comme bloc d’alimentation CC approuvé pour l’ADC-VDB770
DC Power Supply Image

Imagen de suministro de energía CD

Imagem da fonte de alimentação CC
Image du bloc d’alimentation CC
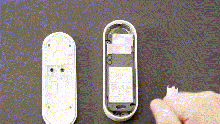
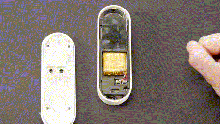
Battery Replacement (using ADC-VDBA-770BAT or ADC-VDBA-770BLI)
Existing Battery Removal
- Turn off power to the doorbell circuit (transformer)
- Use the included Removal Tool (white plastic) to separate the ADC-VDB770 from the backplate
- Lay the ADC-VDB770 with the front surface facing down on a soft (to protect the camera lens) flat surface
- If the ADC-VDB770 is hot to the touch, allow the device to cool before proceeding
- On the back of the ADC-VDB770, starting from the bottom right corner, carefully peel off the plastic cover that contains the white product label (with MAC address, HWV and other printed labeling)
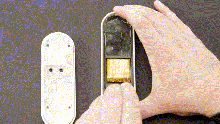
- Use the 3-prong end of the Connector Tool (metallic) to disconnect the battery and heater wire connections from the ADC-VDB770 as follows:
- Holding the Connector Tool vertically, insert the 3-prong end into the gap below the battery and heater wire connectors (on the side of the connectors that does not have the wire runs) with the prongs facing towards the connectors
- Slide the Connector Tool towards the connectors such that the prongs are underneath the edges of both connectors
- Pull up (away from the ADC-VDB770) gently on the Connector Tool until both connectors pop free from the sockets on the ADC-VDB770
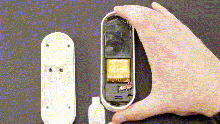
- Use the Removal Tool (white plastic) to remove the battery from the ADC-VDB770 as follows:
- NOTE: Do NOT use the Connector Tool (metallic) or any other metallic tool to remove the battery as this could result in puncturing the casing
- Insert the front edge of the Removal Tool into the small gap on the left side (the side opposite the wires) of the battery
- Gently push the top of the Removal Tool away from the battery, so that the bottom portion of the tool wedges underneath the battery to separate it from the ADC-VDB770
- Remove the battery, with attached heater and two sets of connectors and wires, from the ADC-VDB770
Existing Battery-Less Insert Removal
This procedure should be used before physical installation for VDB770 units that are packaged with the Battery-Less Insert (HWV0310 or later) and will be connected to a wired digital chime.
- Lay the ADC-VDB770 with the front surface facing down on a soft (to protect the camera lens) flat surface
- On the back of the ADC-VDB770, starting from the bottom right corner, peel off the white product label (with MAC address, HWV and other printed labeling)
- If the white product label is adhered to a thin black plastic cover, carefully remove the entire cover and attached label (you will re-use this cover/label after the battery and heater are installed)
- Use the 2-prong end of the Connector Tool (metallic) to disconnect the Battery-Less Insert wire connection from the ADC-VDB770 as follows:
- Holding the Connector Tool vertically, insert the 2-prong end into the gap below the wire connector (on the side of the connector that does not have the wire run) with the prongs facing towards the connector
- Slide the Connector Tool towards the connector such that the prongs are underneath the connector edges
- Pull up (away from the ADC-VDB770) gently on the Connector Tool until the connector pops free from the socket on the ADC-VDB770
- Remove the Battery-Less Insert, with attached wires and connector, from the ADC-VDB770
Replacement Battery Installation
- Peel away (holding the pull tab) the adhesive cover on the back side of the replacement battery and heater
- Seat the battery into the compartment on the back side of the ADC-VDB770, with the adhesive (back) side facing down (contacting the ADC-VDB770) and the wires and connectors facing up and located in the bottom right corner (next to the sockets on the ADC-VDB770)
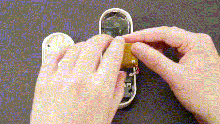
- Connect the battery and heater wire connectors to the sockets on the ADC-VDB770, using the following guidance:
- The heater is a 2-wire connector and should be connected to the 2-pin socket on the right
- The battery is a 3-wire connector and should be connected to the 3-pin socket on the left
- The bottom surface of the 2-prong end of the Connector Tool (metallic) can be used to carefully press the connectors into the sockets
- Verify that both connectors are fully pressed into the sockets
- If there is any damage to the wiring, connectors, or sockets, the entire ADC-VDB770 device should be replaced
- Replace the plastic cover that contains the white product label (with MAC address, HWV and other printed labeling) so that it covers the entire battery compartment and connectors
- If installing the battery and heater into a VDB770 unit packaged with the Battery-Less Insert (HWV0310 or later), this may be a different label than was originally covering the Battery-Less Insert (if the original label was not adhered to a thin black plastic cover); in this case, the thin black plastic cover that contains the white product label can be found adhered to the back of the reference card (that contains the MAC address) in the VDB770 box
- Reattach the ADC-VDB770 to the backplate
- Restore power to the doorbell circuit (transformer)
- Verify that the ADC-VDB770 and wired chime are behaving normally after pressing the button
Replacement Battery-Less Insert Installation
This procedure should be used to install a battery-less insert (ADC-VDBA-770BLI) as a replacement for an existing battery in installations with a mechanical or no wired chime.
- Connect the wire connector to the socket on the ADC-VDB770, using the following guidance
- The connector is a 3-wire connector and should be connected to the 3-pin socket on the left
- The bottom surface of the 2-prong end of the Connector Tool (metallic) can be used to carefully press the connector into the socket
- Verify that the connector is fully pressed into the socket
- If there is any damage to the wiring, connector, or socket, the entire ADC-VDB770 device should be replaced
- Seat the battery-less insert into the compartment on the back side of the ADC-VDB770 with the circuit board oriented on the right side and with the excess wire routed in the space to the right of the circuit board; verify that the wire is running freely from the socket and is not pinned underneath the battery-less insert
- Replace the plastic cover that contains the white product label (with MAC address, HWV and other printed labeling) so that it covers the entire compartment and connector
- Reattach the ADC-VDB770 to the backplate
- Restore power to the doorbell circuit (transformer)
- Verify that the ADC-VDB770 and wired chime are behaving normally after pressing the button

Copyright © 2000-2024, Alarm.com. All rights reserved.
Alarm.com and the Alarm.com Logo are registered trademarks of Alarm.com.
Copyright © 2000-2024, Alarm.com. Todos los derechos reservados.
Alarm.com y el logotipo de Alarm.com son marcas registradas de Alarm.com.
Copyright © 2000-2024, Alarm.com. Todos os direitos reservados.
Alarm.com e o logotipo Alarm.com são marcas registradas da Alarm.com.
Copyright © 2000-2024, Alarm.com. Tous droits réservés.
Alarm.com et le logo d’Alarm.com sont des marques de commerce déposées d’Alarm.com.
![]()
![]()
![]()
